【Flutter】AppBarをスケスケに!?

今回の成果物
今回はみなさんのappBarをスケスケにしちゃいます!
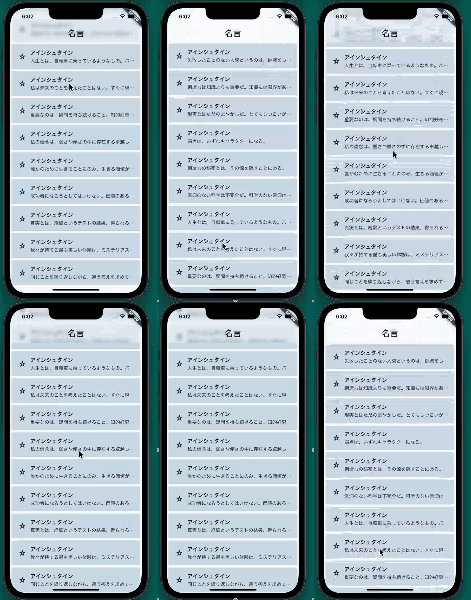
今回の開発環境について紹介
開発環境
- VSCode 1.73.1
- Flutter 3.3.9
- Dart 2.18.5
早速作ってみる
こちらが該当するコード全体です。
 Scaffold(
        extendBodyBehindAppBar: true,
        appBar: AppBar(
          backgroundColor: Colors.white.withAlpha(100),
          elevation: 0,
          flexibleSpace: ClipRect(
            child: BackdropFilter(
              filter: ImageFilter.blur(sigmaX: 5, sigmaY: 5),
              child: Container(color: Colors.transparent),
            ),
          ),
          title: const Text('名言'),
          titleTextStyle: const TextStyle(
            color: Colors.black,
            fontSize: 25,
          ),
        ),
 );
今回のメイン部分を見ていきましょう
extendBodyBehindAppBar: true,
本来であればappBar部分にbodyの要素を表示できませんがこのコードを追加するだけでappBar部分に表示が可能になります!
backgroundColor: Colors.white.withAlpha(100),
Colors.white.withAlphaを実行するだけでほぼ完成と言っても過言ではないです。
flexibleSpace: ClipRect(
            child: BackdropFilter(
              filter: ImageFilter.blur(sigmaX: 5, sigmaY: 5),
              child: Container(color: Colors.transparent),
            ),
          ),
このコードは追記してもどちらでもよろしいです。 追記することでappBar裏のWidgetにモザイクのようなものがかかるようになります。
filter: ImageFilter.blur(sigmaX: 5, sigmaY: 5),
また、ここの値を小さくすることでモザイクの粗さを調整することが可能になります。
まとめ
appBarを透過させることでスタイリッシュなアプリ開発ができますね! ご一読いただきありがとうございました!
参考にしたもの

取扱店マップを作れる「ロコッタ(Locotta)」をリリースしました
ブランドの商品を買えるお店を、ひとつの地図に。取扱店マップ作成サービス「ロコッタ(Locotta)」をリリースしました。ホームページがなくても専用URLで公開でき、自社サイトへの埋め込みにも対応。初回公開から7日間無料で試せます。
Read More
AIでホームページを作れる「ホムっぺ(homppe)」を紹介します
デザインの知識ゼロでも、書いて、答えて、選ぶだけ。AIがプロ品質のホームページを生成するサービス「ホムっぺ(ホムッペ・homppe)」を紹介します。無料で始められて、クレジットカード登録も不要です。
Read More



取扱店マップを作れる「ロコッタ(Locotta)」をリリースしました
ブランドの商品を買えるお店を、ひとつの地図に。取扱店マップ作成サービス「ロコッタ(Locotta)」をリリースしました。ホームページがなくても専用URLで公開でき、自社サイトへの埋め込みにも対応。初回公開から7日間無料で試せます。
Read MoreAIでホームページを作れる「ホムっぺ(homppe)」を紹介します
デザインの知識ゼロでも、書いて、答えて、選ぶだけ。AIがプロ品質のホームページを生成するサービス「ホムっぺ(ホムッペ・homppe)」を紹介します。無料で始められて、クレジットカード登録も不要です。
Read More