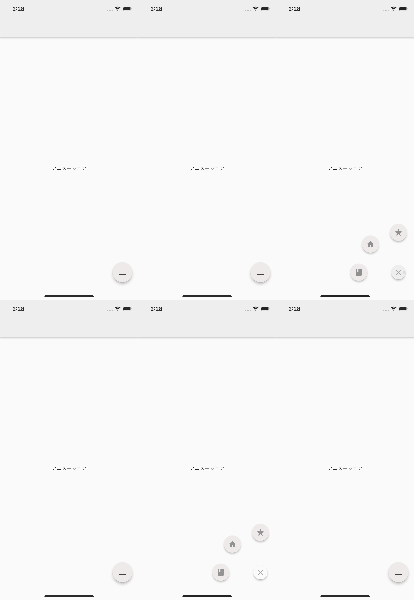
【Flutter】コピペで使えるFloatingActionButtonのアニメーション
Version
- Flutter 2.10.1
- Dart 2.16.1
実装例

始めに
FlutterでFloatingActionButtonを複数実装したい場合に画面にいくつもボタンが存在すると見栄えが微妙になってしまいます。アニメーションを用いてタップ時に複数ボタンが出現するようにできれば見栄えもよくリッチなUIになります。今回はパッケージを一切使わずにコピペだけでできるアニメーションを実装します。
実装
ファイルの作成
始めに、アニメーションのコードを格納するためのファイルを作成します。

アニメーション用コードを実装
次に、作成したファイルに次のコードをコピペします。
fab_animation.dart
import 'dart:math' as math;
import 'package:flutter/material.dart';
class ExpandableFab extends StatefulWidget {
const ExpandableFab({
Key? key,
this.initialOpen,
required this.distance,
required this.children,
}) : super(key: key);
final bool? initialOpen;
final double distance;
final List<Widget> children;
_ExpandableFabState createState() => _ExpandableFabState();
}
class _ExpandableFabState extends State<ExpandableFab>
with SingleTickerProviderStateMixin {
late final AnimationController _controller;
late final Animation<double> _expandAnimation;
bool _open = false;
void initState() {
super.initState();
_open = widget.initialOpen ?? false;
_controller = AnimationController(
value: _open ? 1.0 : 0.0,
duration: const Duration(milliseconds: 250),
vsync: this,
);
_expandAnimation = CurvedAnimation(
curve: Curves.fastOutSlowIn,
reverseCurve: Curves.easeOutQuad,
parent: _controller,
);
}
void dispose() {
_controller.dispose();
super.dispose();
}
void _toggle() {
setState(() {
_open = !_open;
if (_open) {
_controller.forward();
} else {
_controller.reverse();
}
});
}
Widget build(BuildContext context) {
return SizedBox.expand(
child: Stack(
alignment: Alignment.bottomRight,
clipBehavior: Clip.none,
children: [
_buildTapToCloseFab(),
..._buildExpandingActionButtons(),
_buildTapToOpenFab(),
],
),
);
}
Widget _buildTapToCloseFab() {
return SizedBox(
width: 56.0,
height: 56.0,
child: Center(
child: Material(
shape: const CircleBorder(),
clipBehavior: Clip.antiAlias,
elevation: 4.0,
child: InkWell(
onTap: _toggle,
child: Padding(
padding: const EdgeInsets.all(8.0),
child: Icon(
Icons.close,
color: Theme.of(context).primaryColor,
),
),
),
),
),
);
}
List<Widget> _buildExpandingActionButtons() {
final children = <Widget>[];
final count = widget.children.length;
final step = 90.0 / (count - 1);
for (var i = 0, angleInDegrees = 0.0;
i < count;
i++, angleInDegrees += step) {
children.add(
_ExpandingActionButton(
directionInDegrees: angleInDegrees,
maxDistance: widget.distance,
progress: _expandAnimation,
child: widget.children[i],
),
);
}
return children;
}
Widget _buildTapToOpenFab() {
return IgnorePointer(
ignoring: _open,
child: AnimatedContainer(
transformAlignment: Alignment.center,
transform: Matrix4.diagonal3Values(
_open ? 0.7 : 1.0,
_open ? 0.7 : 1.0,
1.0,
),
duration: const Duration(milliseconds: 250),
curve: const Interval(0.0, 0.5, curve: Curves.easeOut),
child: AnimatedOpacity(
opacity: _open ? 0.0 : 1.0,
curve: const Interval(0.25, 1.0, curve: Curves.easeInOut),
duration: const Duration(milliseconds: 250),
child: FloatingActionButton(
backgroundColor: Colors.brown.shade50,
onPressed: _toggle,
child: const Icon(Icons.add),
),
),
),
);
}
}
class _ExpandingActionButton extends StatelessWidget {
const _ExpandingActionButton({
Key? key,
required this.directionInDegrees,
required this.maxDistance,
required this.progress,
required this.child,
}) : super(key: key);
final double directionInDegrees;
final double maxDistance;
final Animation<double> progress;
final Widget child;
Widget build(BuildContext context) {
return AnimatedBuilder(
animation: progress,
builder: (context, child) {
final offset = Offset.fromDirection(
directionInDegrees * (math.pi / 180.0),
progress.value * maxDistance,
);
return Positioned(
right: 4.0 + offset.dx,
bottom: 4.0 + offset.dy,
child: Transform.rotate(
angle: (1.0 - progress.value) * math.pi / 2,
child: child!,
),
);
},
child: FadeTransition(
opacity: progress,
child: child,
),
);
}
}
class ActionButton extends StatelessWidget {
const ActionButton({
Key? key,
this.onPressed,
required this.icon,
}) : super(key: key);
final VoidCallback? onPressed;
final Widget icon;
Widget build(BuildContext context) {
final theme = Theme.of(context);
return Material(
shape: const CircleBorder(),
clipBehavior: Clip.antiAlias,
color: Colors.brown.shade50,
elevation: 4.0,
child: IconButton(
onPressed: onPressed,
icon: icon,
color: theme.colorScheme.secondary,
),
);
}
}
class FakeItem extends StatelessWidget {
const FakeItem({
Key? key,
required this.isBig,
}) : super(key: key);
final bool isBig;
Widget build(BuildContext context) {
return Container(
margin: const EdgeInsets.symmetric(vertical: 8.0, horizontal: 24.0),
height: isBig ? 128.0 : 36.0,
decoration: BoxDecoration(
borderRadius: const BorderRadius.all(Radius.circular(8.0)),
color: Colors.grey.shade300,
),
);
}
}
FloatingActionButtonの実装
次に、FloatingActionButtonを使いたいファイルに移動し、以下のように記述して実装完了です。
main.dart
import 'package:flutter/material.dart';
import 'fab_animation.dart';
.....
class _MyHomePageState extends State<MyHomePage> {
Widget build(BuildContext context) {
return Scaffold(
appBar: AppBar(
backgroundColor: Colors.grey.shade200,
title: Text(widget.title),
),
floatingActionButton: ExpandableFab(
distance: 112.0,
children: [
ActionButton(icon: const Icon(Icons.book),onPressed: (){},),
ActionButton(icon: const Icon(Icons.home), onPressed: (){},),
ActionButton(icon: const Icon(Icons.star), onPressed: (){},),
],
), body: const Center(child: Text('アニメーション'),)
);
}
}
アイコンや色の変更
fab_animation.dart
Widget _buildTapToOpenFab() {
return IgnorePointer(
ignoring: _open,
child: AnimatedContainer(
transformAlignment: Alignment.center,
transform: Matrix4.diagonal3Values(
_open ? 0.7 : 1.0,
_open ? 0.7 : 1.0,
1.0,
),
duration: const Duration(milliseconds: 250),
curve: const Interval(0.0, 0.5, curve: Curves.easeOut),
child: AnimatedOpacity(
opacity: _open ? 0.0 : 1.0,
curve: const Interval(0.25, 1.0, curve: Curves.easeInOut),
duration: const Duration(milliseconds: 250),
child: FloatingActionButton(
backgroundColor: Colors.brown.shade50,//ボタン格納時のカラー
onPressed: _toggle,
child: const Icon(Icons.add),//ボタン格納時のアイコン
),
),
),
);
}
}
.....
class ActionButton extends StatelessWidget {
const ActionButton({
Key? key,
this.onPressed,
required this.icon,
}) : super(key: key);
final VoidCallback? onPressed;
final Widget icon;
Widget build(BuildContext context) {
final theme = Theme.of(context);
return Material(
shape: const CircleBorder(),
clipBehavior: Clip.antiAlias,
color: Colors.brown.shade50,//ボタンのカラー
elevation: 4.0,
child: IconButton(
onPressed: onPressed,
icon: icon,
color: theme.colorScheme.secondary,
),
);
}
}
画面遷移したい時
ボタンから画面遷移したい場合はheroTagを指定する必要があります。
fab_animation.dart
Widget _buildTapToOpenFab() {
    return IgnorePointer(
      ignoring: _open,
      child: AnimatedContainer(
        transformAlignment: Alignment.center,
        transform: Matrix4.diagonal3Values(
          _open ? 0.7 : 1.0,
          _open ? 0.7 : 1.0,
          1.0,
        ),
        duration: const Duration(milliseconds: 250),
        curve: const Interval(0.0, 0.5, curve: Curves.easeOut),
        child: AnimatedOpacity(
          opacity: _open ? 0.0 : 1.0,
          curve: const Interval(0.25, 1.0, curve: Curves.easeInOut),
          duration: const Duration(milliseconds: 250),
          child: FloatingActionButton(
            heroTag: '',//任意のheroTagを指定
            backgroundColor: Colors.brown.shade50,
            onPressed: _toggle,
            child: const Icon(Icons.add),
          ),
        ),
      ),
    );
  }
}
最後に
今回はFlutterのFloatingActionButtonのアニメーションの実装方法を紹介しました。パッケージを使えばもっと色々なアニメーションも実装が可能ですが、今回紹介したものはコピペで簡単に実装できるのでぜひ利用してみてください。
参考
カリキュラムなし!学びたいことだけをプロと学べる『TechCampus』の詳細情報
カリキュラムなし!学びたいことだけをプロと学べる『TechCampus』の詳細情報!興味のある人はぜひコミュニティに参加ください!
Read More可茂IT塾ではFlutterインターンを募集しています!
可茂IT塾ではFlutterインターンを募集しています!可茂IT塾のエンジニアの判断で、一定以上のスキルをを習得した方には有給でのインターンも受け入れています。
Read Moreカリキュラムなし!学びたいことだけをプロと学べる『TechCampus』の詳細情報
カリキュラムなし!学びたいことだけをプロと学べる『TechCampus』の詳細情報!興味のある人はぜひコミュニティに参加ください!
Read More可茂IT塾ではFlutterインターンを募集しています!
可茂IT塾ではFlutterインターンを募集しています!可茂IT塾のエンジニアの判断で、一定以上のスキルをを習得した方には有給でのインターンも受け入れています。
Read More