【Flutter】Widgetを強調する

BackdropFilterを使えば、Widgetを暗くしたりぼかしたりする事ができます。
公式ドキュメントを読みながら簡単にハンズオンをしてみましょう!
BackdropFilter
BackdropFilterは、親Widgetに対してフィルターをかけた上から子Widgetを描画します。これ大事です。
準備
こちらのコードに対してBackdropFilterを使ってみましょう!
import 'package:flutter/material.dart';
void main() {
runApp(
const MaterialApp(
home: MyApp(),
debugShowCheckedModeBanner: false,
),
);
}
class MyApp extends StatelessWidget {
const MyApp({Key? key}) : super(key: key);
Widget build(BuildContext context) {
return Scaffold(
backgroundColor: Colors.tealAccent,
body: Center(
child: Container(
height: 600,
width: 600,
color: Colors.lightBlueAccent,
child: Center(
child: Container(
height: 400,
width: 400,
decoration: const BoxDecoration(
image: DecorationImage(
image: NetworkImage(
"https://www.kamo-it.org/_next/image?url=%2Fassets%2Fmember%2Ftaiga.jpg&w=3840&q=75"),
fit: BoxFit.cover,
),
),
child: Center(
child: Row(
mainAxisAlignment: MainAxisAlignment.spaceAround,
children: const [
SearchField(),
SearchButton(),
],
),
),
),
),
),
),
);
}
}
class SearchButton extends StatelessWidget {
const SearchButton({Key? key}) : super(key: key);
Widget build(BuildContext context) {
return Container(
height: 45,
width: 90,
decoration: BoxDecoration(
color: Colors.limeAccent,
borderRadius: BorderRadius.circular(10),
),
child: const Center(
child: Text(
"Search",
style: TextStyle(
fontSize: 20,
),
),
),
);
}
}
class SearchField extends StatelessWidget {
const SearchField({Key? key}) : super(key: key);
Widget build(BuildContext context) {
return Container(
width: 300,
height: 45,
decoration: BoxDecoration(
color: Colors.white,
border: Border.all(color: Colors.limeAccent),
borderRadius: BorderRadius.circular(10)),
child: Row(
children: const [
Padding(
padding: EdgeInsets.all(8.0),
child: SizedBox(
height: 25,
width: 25,
child: Icon(Icons.search),
),
),
Flexible(
child: SizedBox(
height: 30,
width: 200,
child: TextField(
decoration: InputDecoration(
border: InputBorder.none,
),
),
),
)
],
),
);
}
}
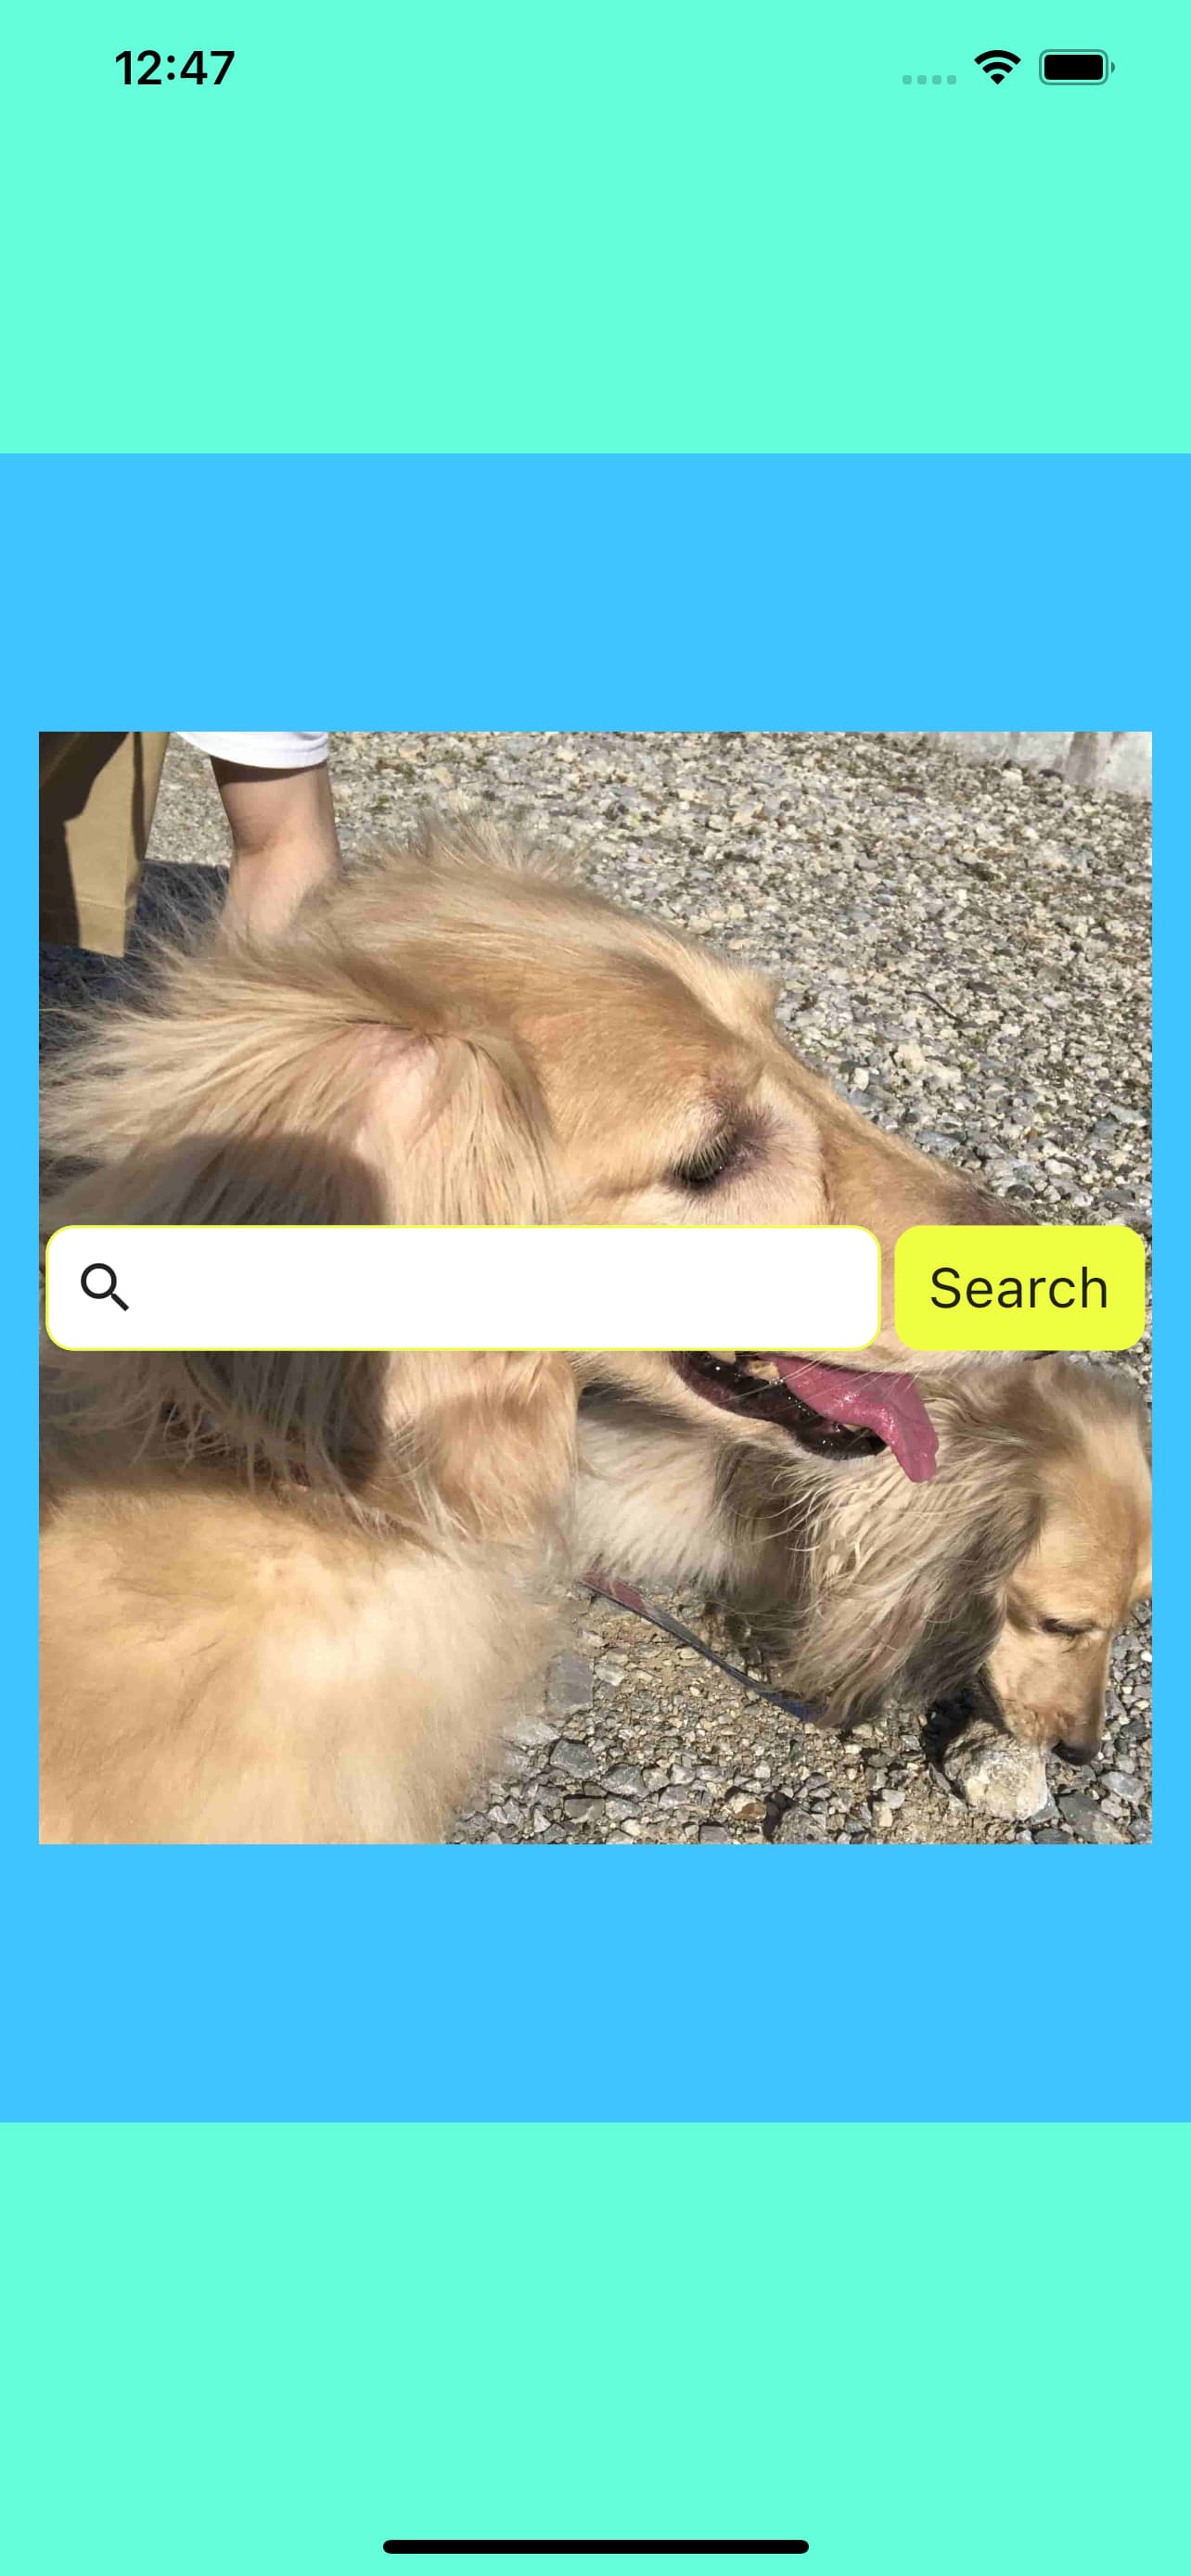
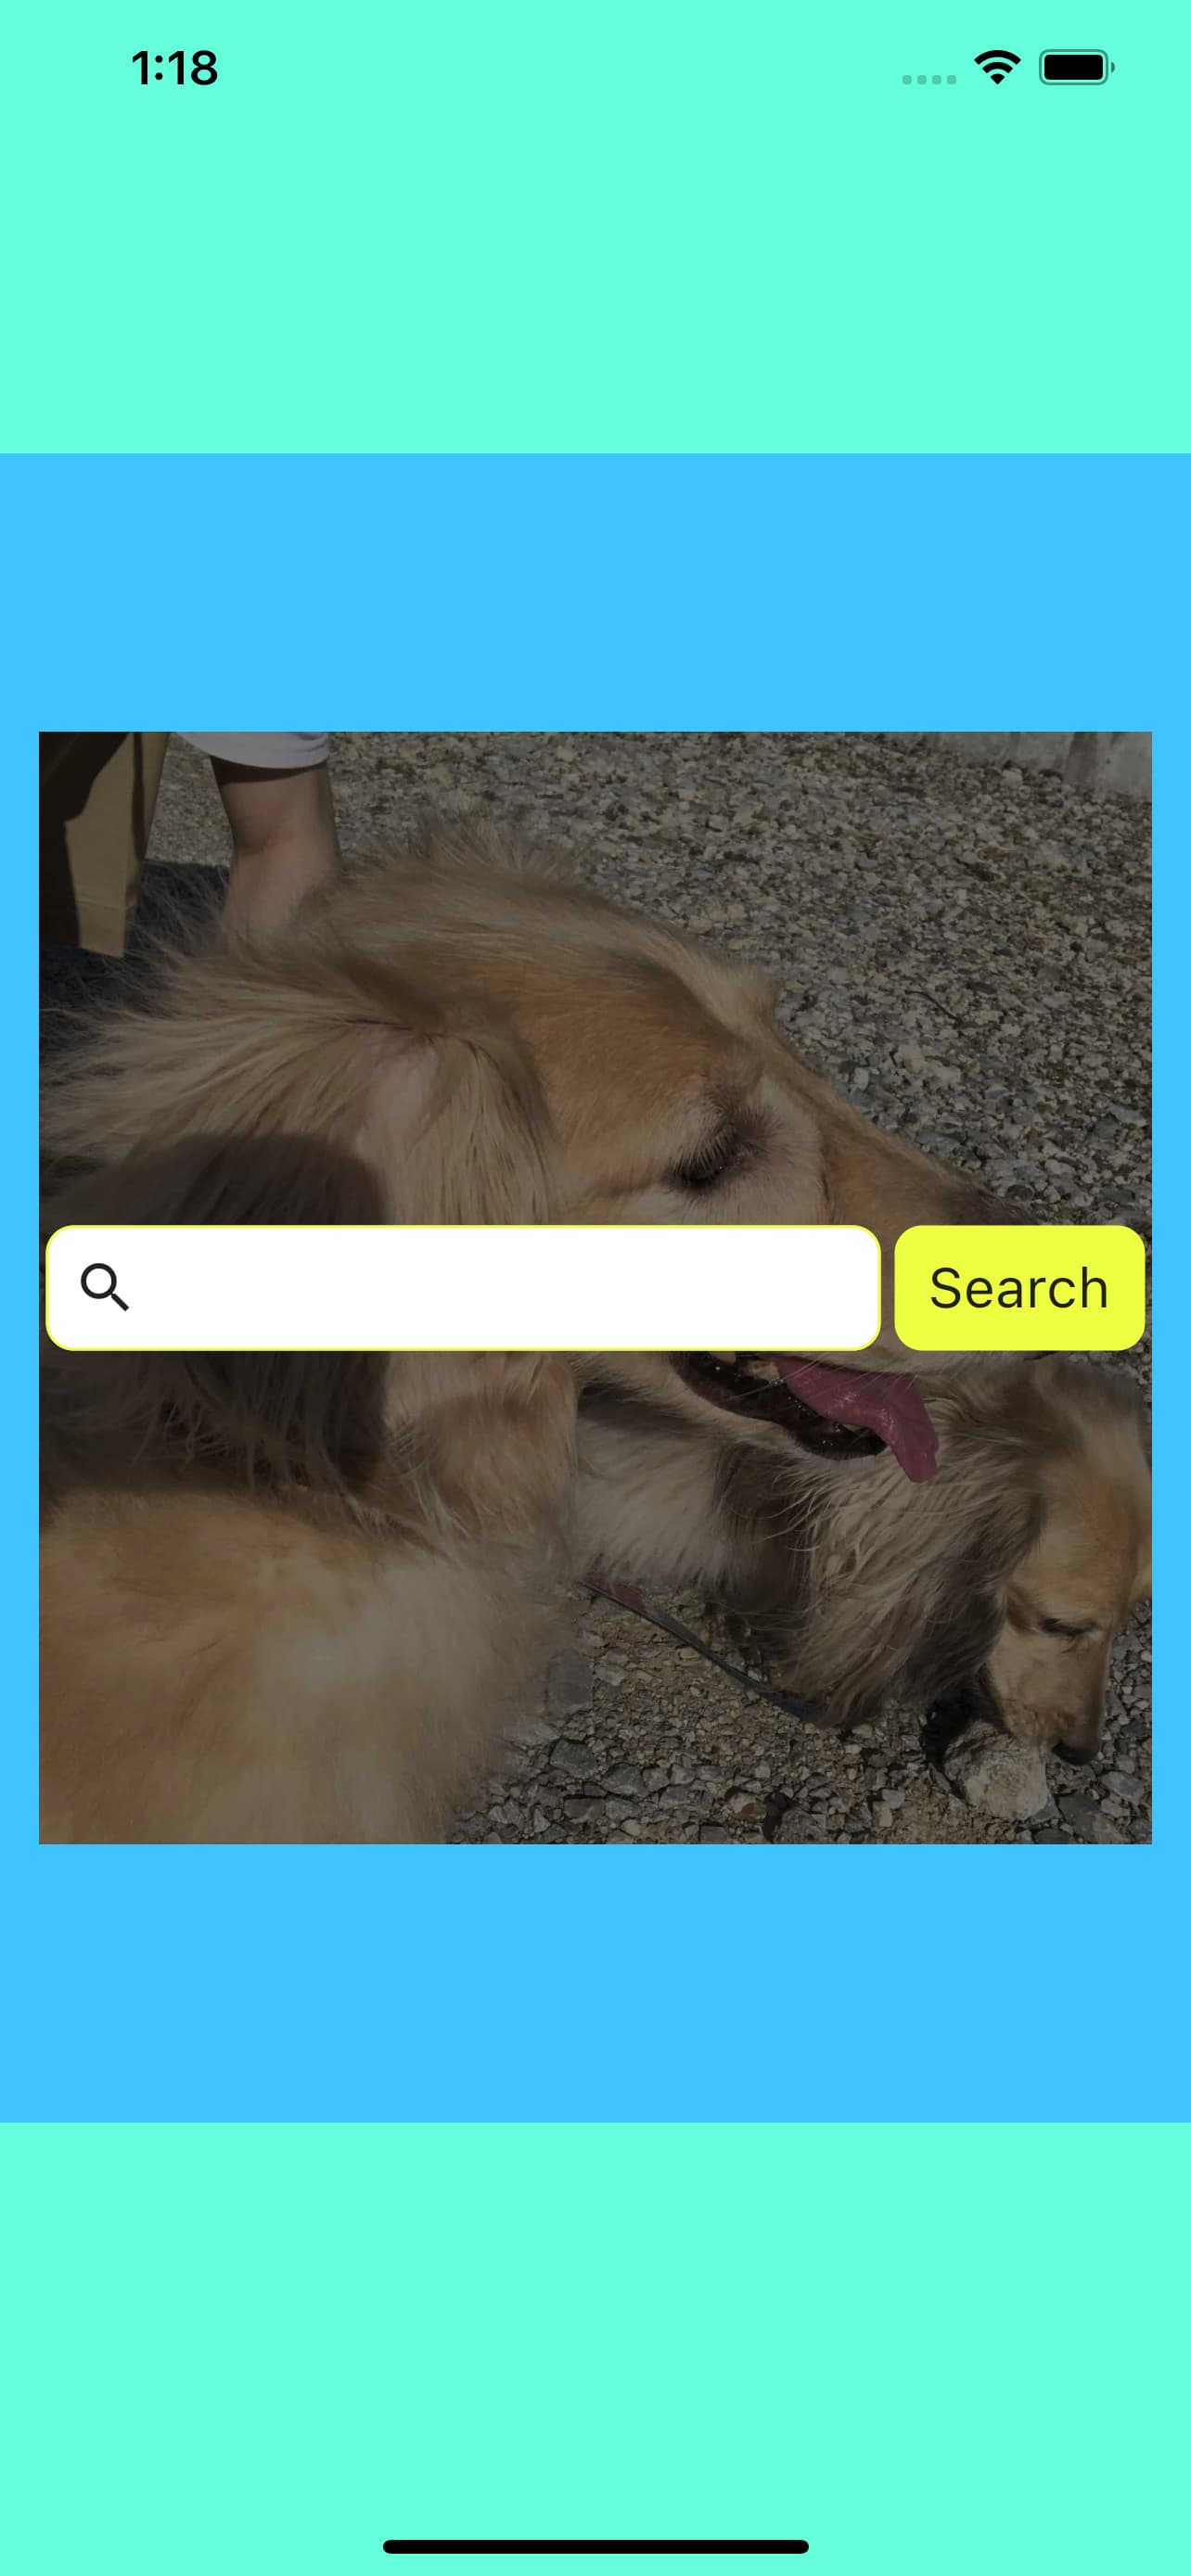
初期状態ではこのような画面構成になります。
Widgetをぼかす
公式ドキュメントでは、サンプルコードとしてWidgetをぼかす例が紹介されています。
それでは、例に沿って背景をぼかし、検索ボックスとボタンを強調してみましょう。
検索ボックスとボタンはRowの要素なので、 Rowを強調すれば良さそうです。
BackdropFilterは、親Widgetに対してフィルターをかけた上から子Widgetを描画します。
ということで、Rowの親要素にフィルターをかけ、その上からRowを描画してあげましょう。
では、RowをBackdropFilterでラップしてあげましょう。
公式ドキュメントの例の真似をして、filterにはImageFilter.blurを使います。
BackdropFilter(
  filter: ImageFilter.blur(
    sigmaX: 5.0,
    sigmaY: 5.0,
  ),
  child: Row(
    mainAxisAlignment: MainAxisAlignment.spaceAround,
    children: const [
      SearchField(),
      SearchButton(),
    ],
  ),
),
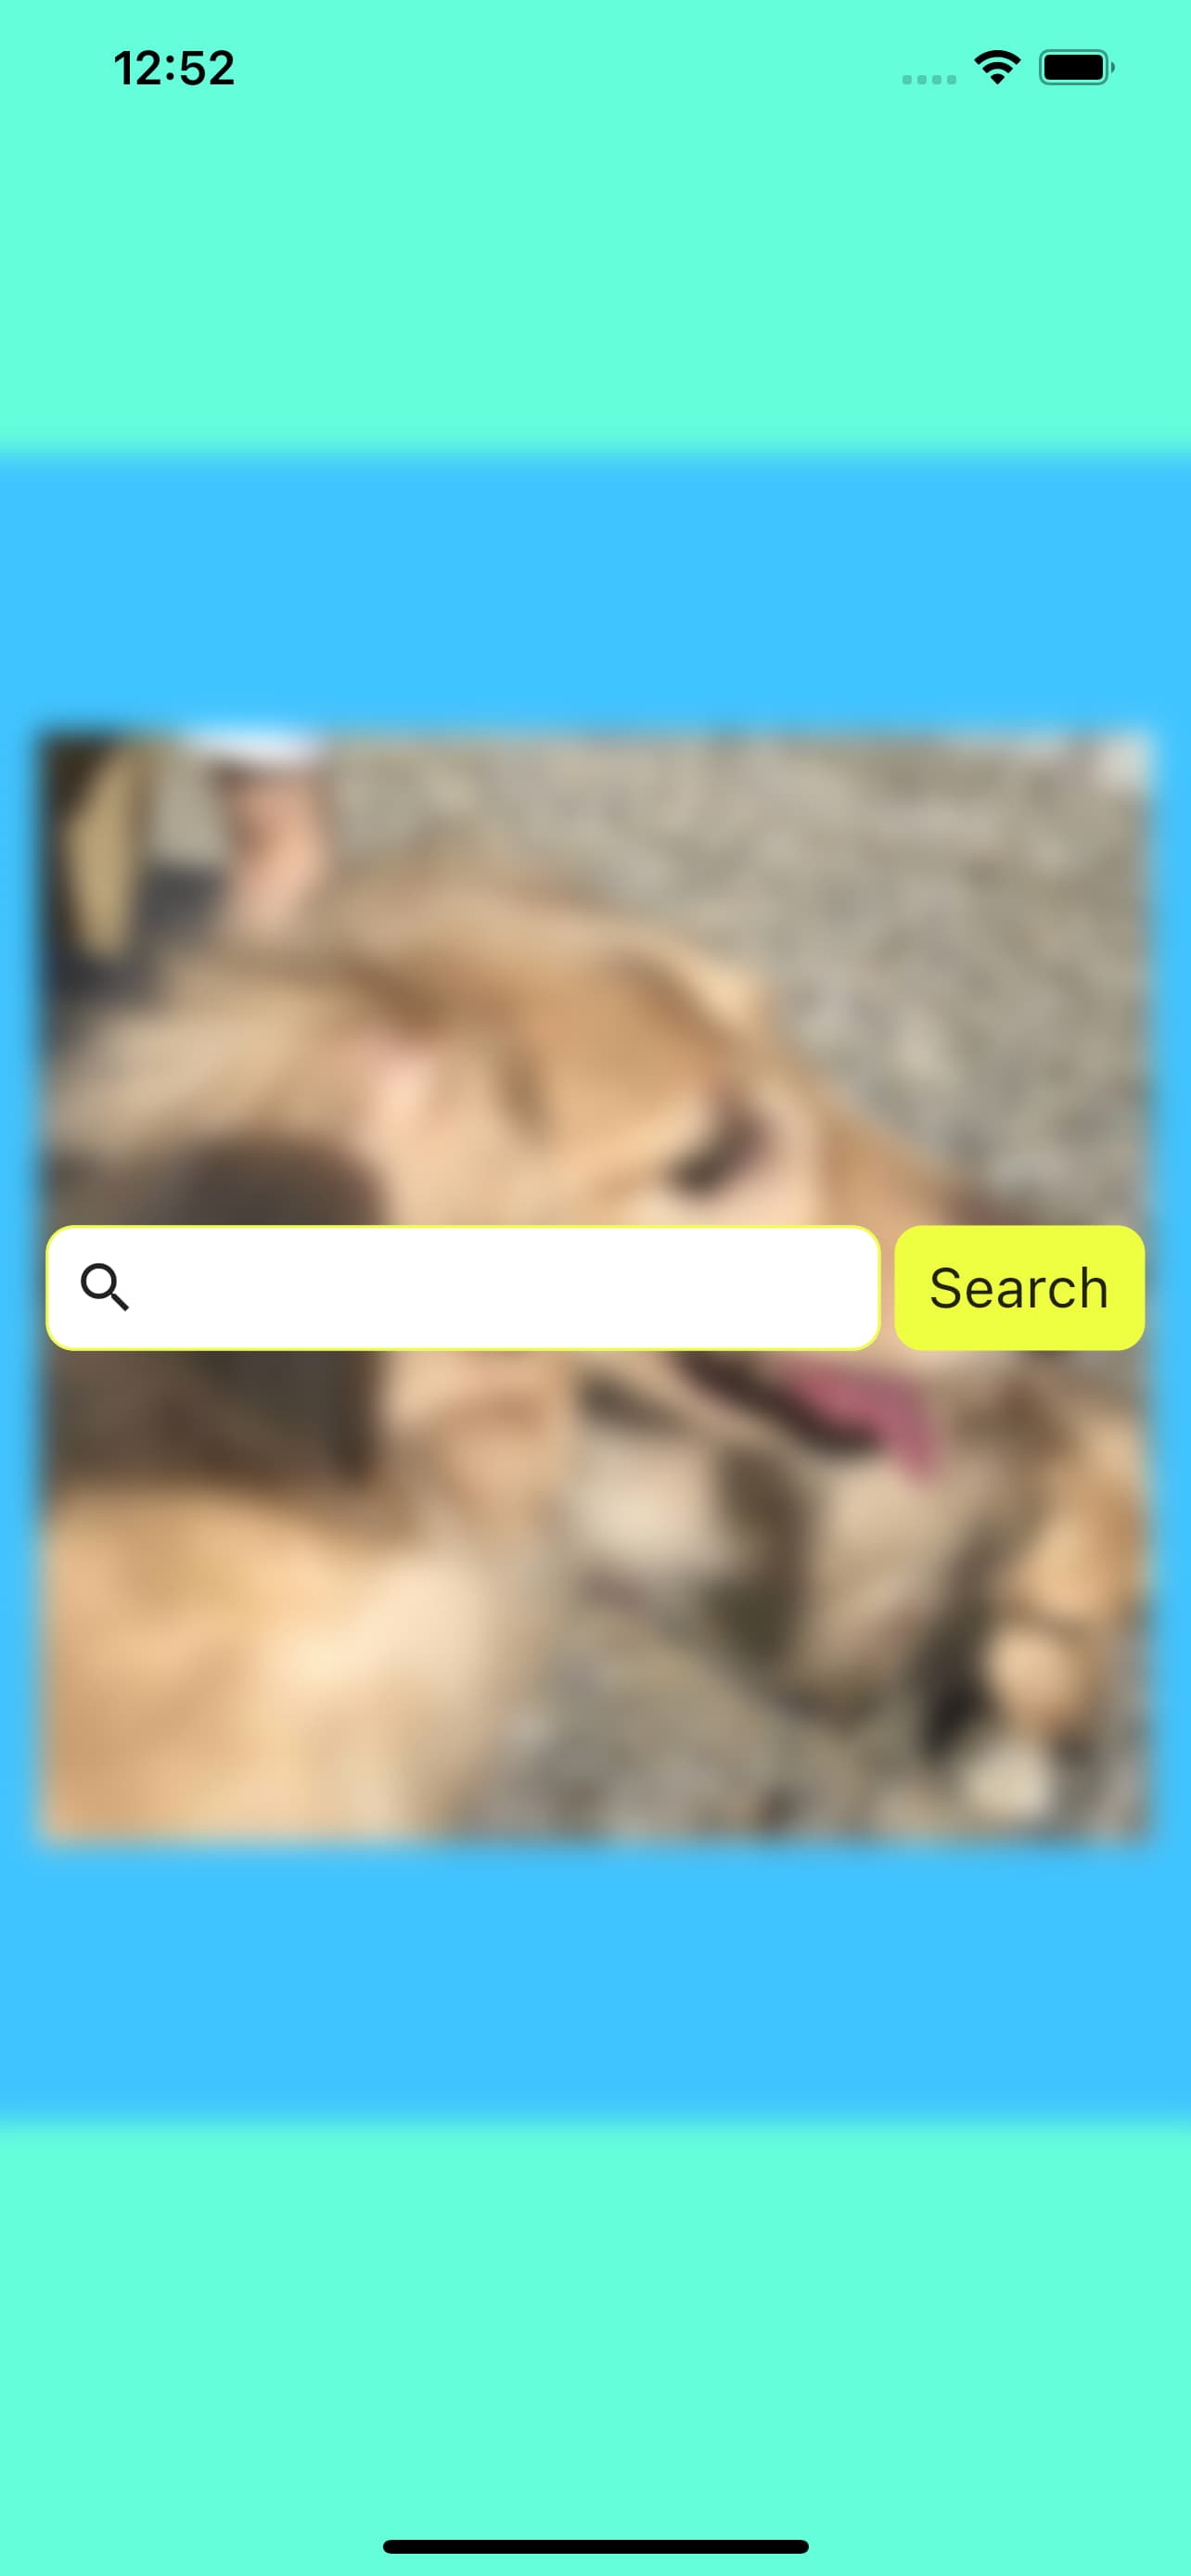
親階層のWidgetをぼかす事ができました。sigmaX, sigmaYをいじってみるとぼかし具合が変わります。
では、子階層のWidgetをぼかしたい場合はどうしたら良いでしょうか。
ドキュメントに聞いてみましょう。
If all you want to do is apply an ImageFilter to a single widget, use ImageFiltered instead.
そういう時はImageFilteredを使え、と言っています。
子Widgetをぼかす
ImageFilteredのドキュメントに目を通しつつ、使ってみましょう。
ImageFiltered(
  imageFilter: ImageFilter.blur(
    sigmaX: 2.0,
    sigmaY: 2.0,
  ),
  child: Row(
    mainAxisAlignment: MainAxisAlignment.spaceAround,
    children: const [
      SearchField(),
      SearchButton(),
    ],
  ),
),
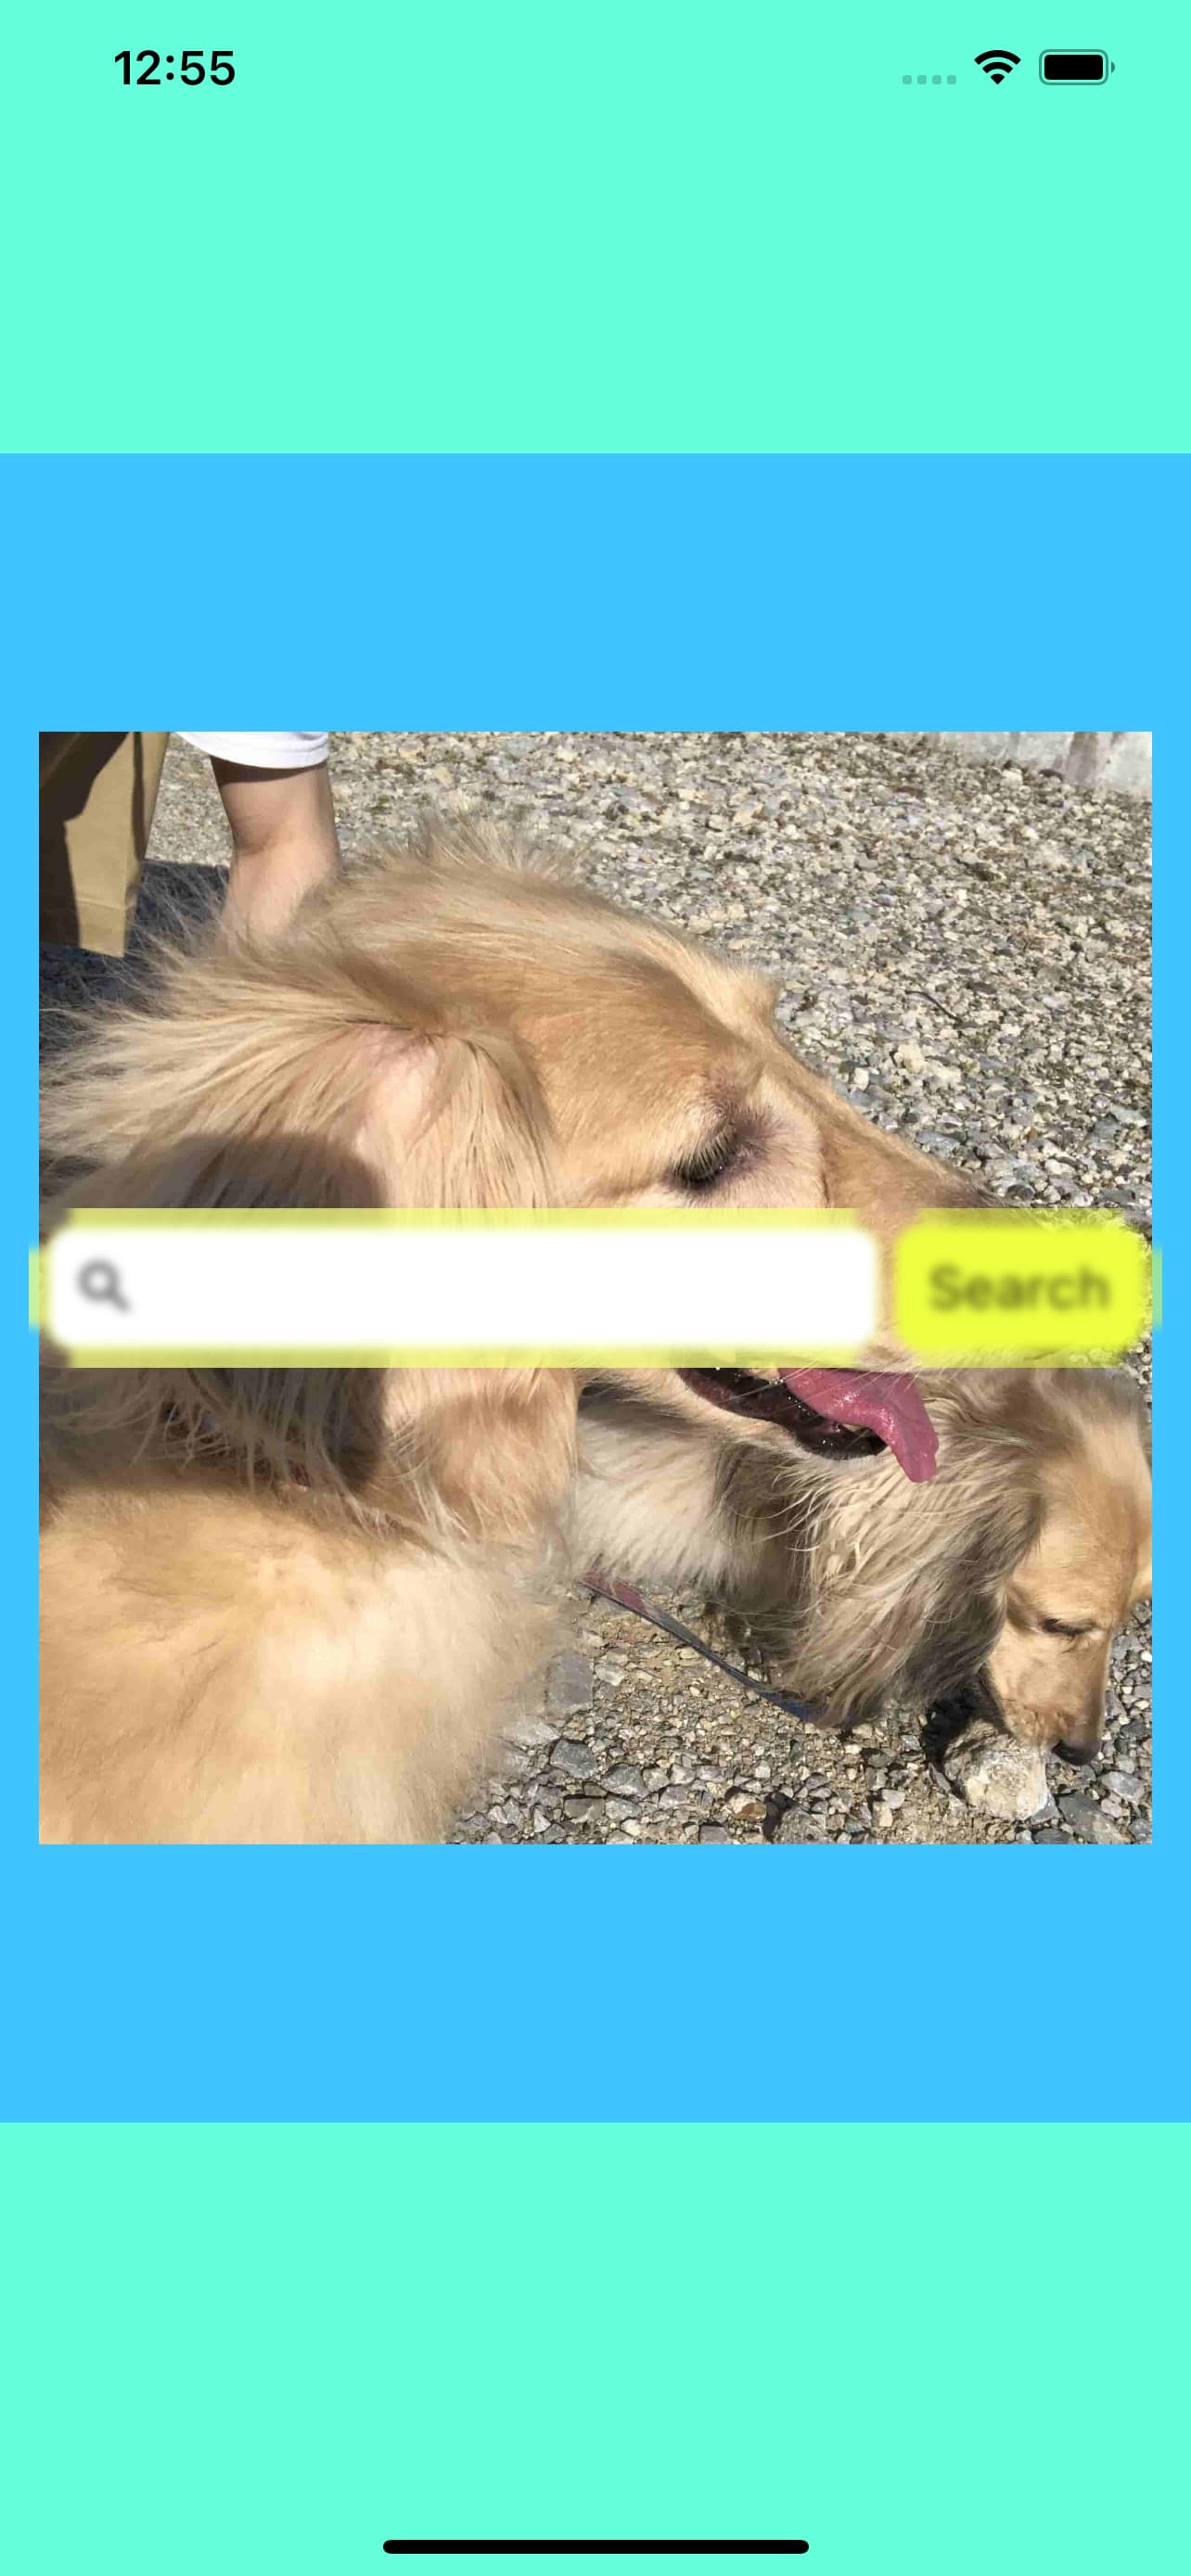
子階層のWidgetをぼかすことができました!(ぐちゃぐちゃ)
これまで見てきた方法は、親以上の階層を全て、または子以下の階層を全てぼかすやり方です。
こうなると今度は任意の階層だけぼかす方法が気になります。 これもドキュメントに聞いてみると、
If the BackdropFilter needs to be applied to an area that exactly matches its child, wraps the BackdropFilter with a clip widget that clips exactly to that child.
Clip widgetとBackdropFilterで囲め、と言っています。実際にやってみましょう。
任意の階層だけぼかす
ここでは、分かりやすさのためfilterにColorFilterを使います。
詳しい説明は省きますが、今回の実装ではフィルターをかけた範囲が暗くなるようにしています。
Center(
  child: ClipRect(
    child: BackdropFilter(
      filter: const ColorFilter.mode(
        Colors.black54,
        BlendMode.darken,
      ),
      child: Row(
        mainAxisAlignment: MainAxisAlignment.spaceAround,
        children: const [
          SearchField(),
          SearchButton(),
        ],
      ),
    ),
  ),
),
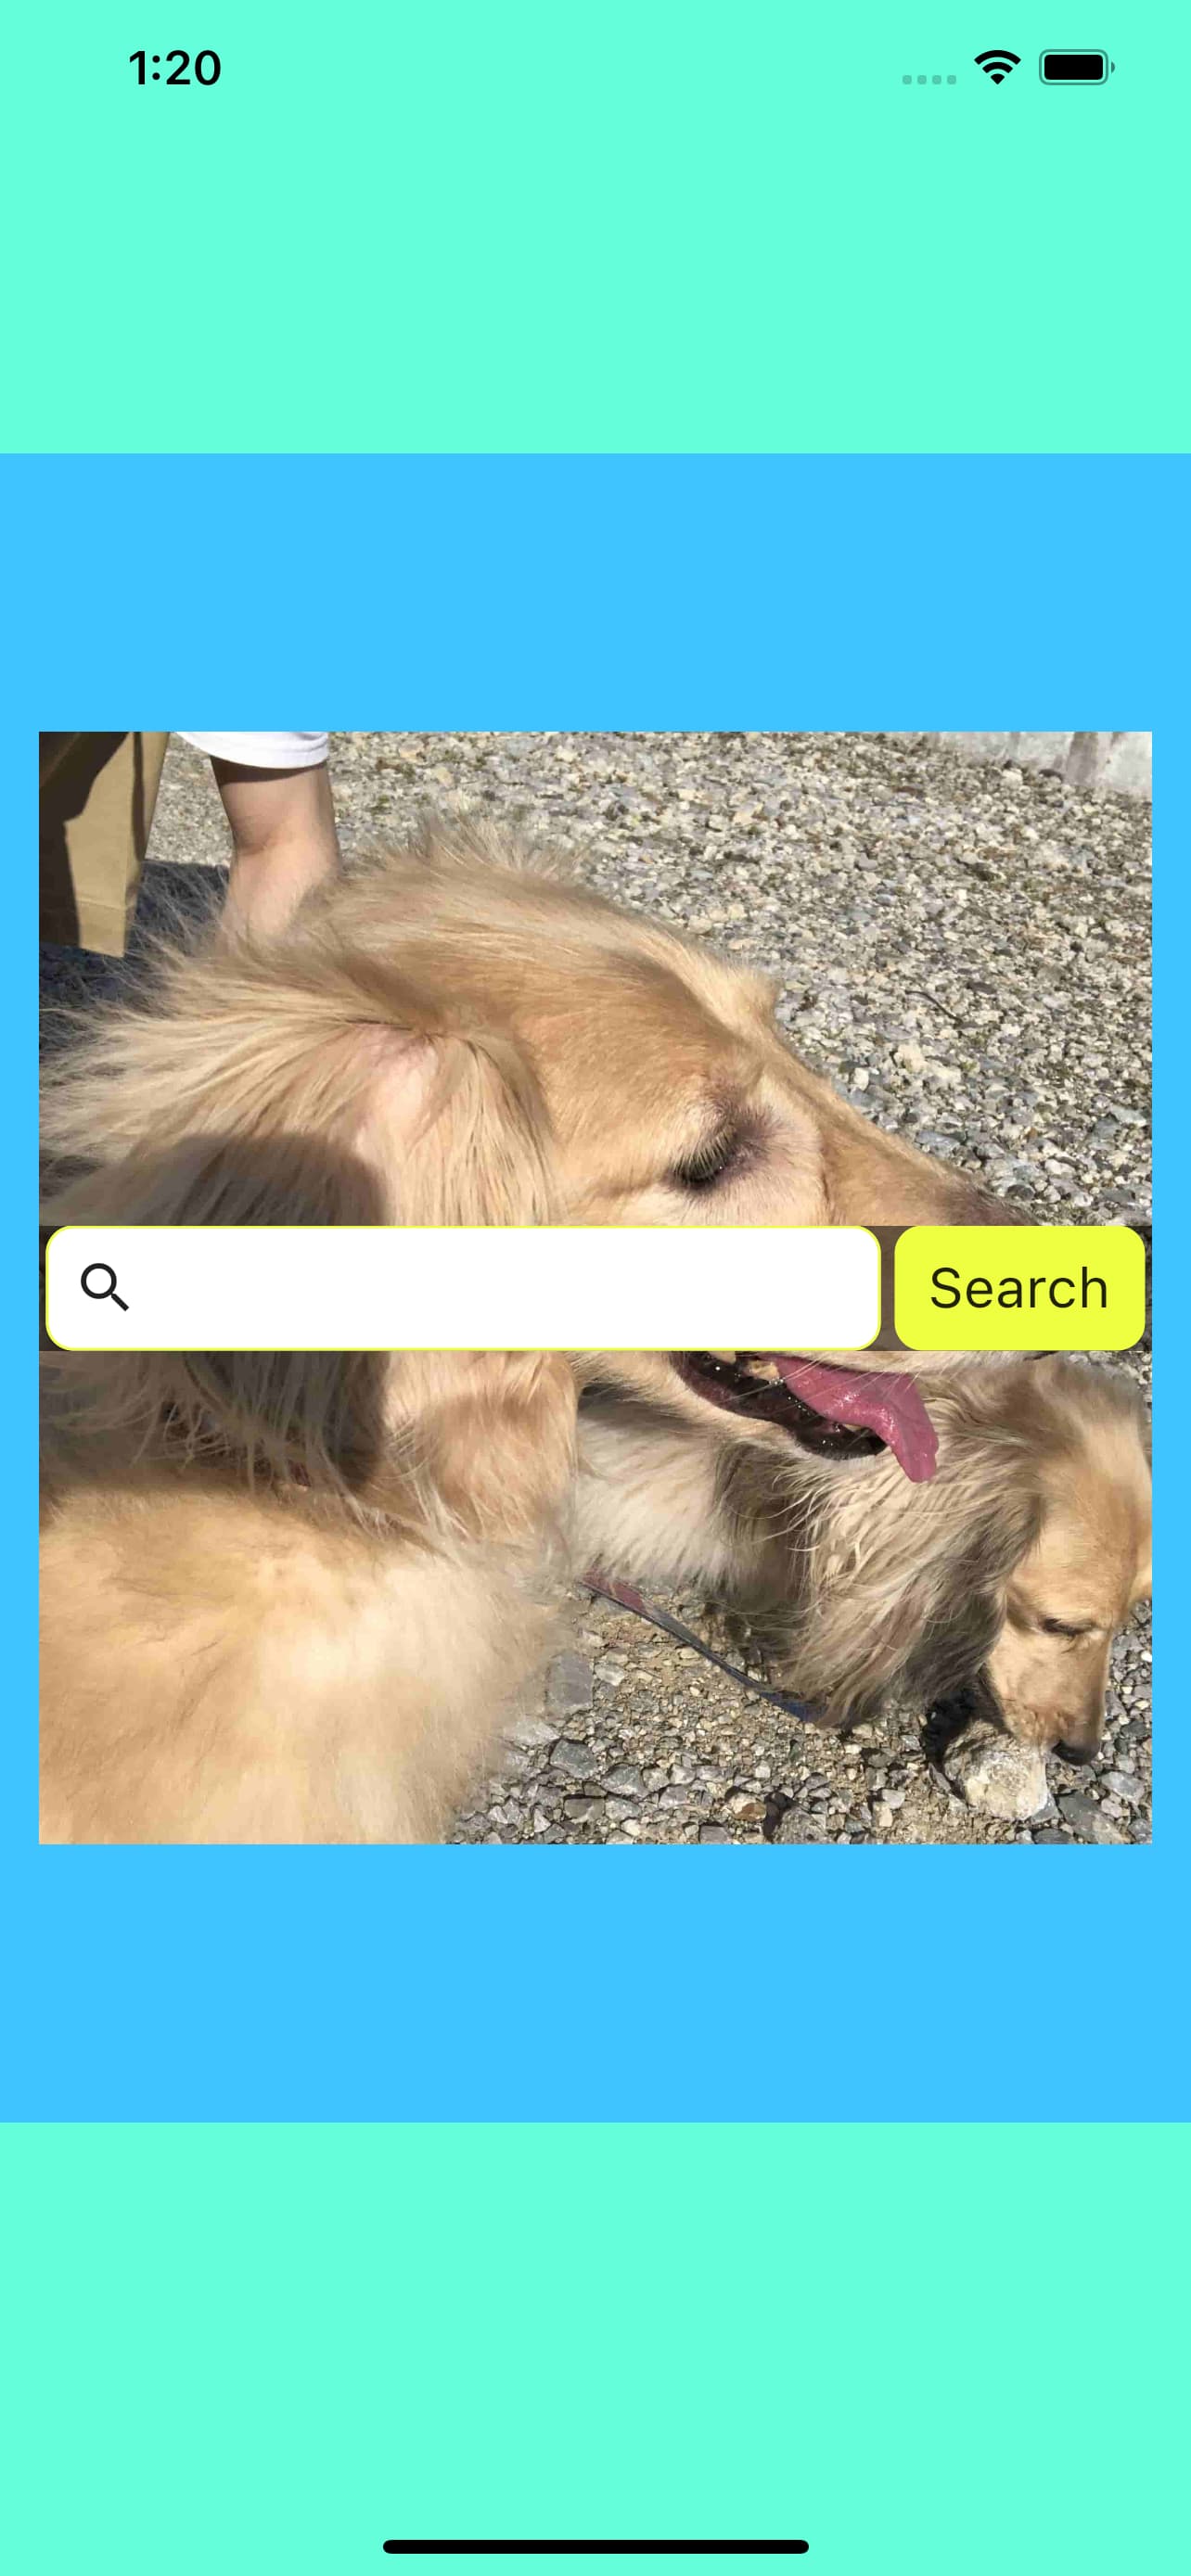
このようにClip WidgetでBackdropFilterを直接ラップすると、検索ボックスとボタンの隙間が暗くなっているのがわかると思います。
これは、Clip Widgetの親であるCenterの階層だけが暗くなっているということです。
このやり方ではClip Widgetの親階層以下、かつBackdropFilterの子階層より上の階層にフィルターがかかります。
では、画像全体が暗くなるようにしてみましょう。
ClipRect(
  child: Center(
    child: BackdropFilter(
      filter: const ColorFilter.mode(
        Colors.black54,
        BlendMode.darken,
      ),
      child: Row(
        mainAxisAlignment: MainAxisAlignment.spaceAround,
        children: const [
          SearchField(),
          SearchButton(),
        ],
      ),
    ),
  ),
),
Clip Widgetでラップする階層を一つ上げました。
これによって、ContainerからCenterまでの階層にフィルターがかかりました。
Clip Widgetの親からBackdropFilterの親まで、任意の階層にフィルターをかけられます。
まとめ
BackdropFilter, ImageFilteredを使ってWidgetをぼかしました。
特定のWidgetの親階層を全て、または子階層を全てぼかす方法と、任意の階層をぼかす方法を知りました。
おまけ
本記事ではあまり触れませんでしたが、ImageFilter, ColorFilterでは画像を反転させたり白黒にしたり、いろいろな事ができます。
勉強しておけば出来ることの幅が広がりそうです!


AIでホームページを作れる「ホムっぺ(homppe)」を紹介します
デザインの知識ゼロでも、書いて、答えて、選ぶだけ。AIがプロ品質のホームページを生成するサービス「ホムっぺ(ホムッペ・homppe)」を紹介します。無料で始められて、クレジットカード登録も不要です。
Read More


新着の記事


AIでホームページを作れる「ホムっぺ(homppe)」を紹介します
デザインの知識ゼロでも、書いて、答えて、選ぶだけ。AIがプロ品質のホームページを生成するサービス「ホムっぺ(ホムッペ・homppe)」を紹介します。無料で始められて、クレジットカード登録も不要です。
Read More